Showing posts with label Michaels Fabrics. Show all posts

Saturday, January 31, 2015

My take on the Burberry Kensington Trench

Well I did enter the Bargainista Fashionista contest. I've had this trench coat fabric around for a few years and decided this was a good excuse to get it sewn. We were to take an expensive garment as inspiration and make our own version of it for a lot less. Challenge on!

This is my inspiration:


My pattern was my venerable Bernina My Label pattern but I did see a Burda and Sewaholic pattern that could be used instead. The good thing about my pattern was I already made it once (a way less complicated version) so I knew it fit quite well.

I did some snoop shopping at Bloomingdale's and frankly I think my fabric was even nicer that the original. It came from Michael's Fabrics so no surprise about that. I, of course, couldn't get the Burberry cotton lining but I got some really nice 100% wool from Mood and it turned out to be perfect for this. Once again, I prefer it to the original lining.

I did have to figure out how the collar worked. It has a collar stand that has a clasp on it so it can be closed for bad weather. I found some very nice brass hardware from Ebay which worked quite well as the D rings and tongues on the buckles were brass. Speaking of the buckles the only ones I could find didn't have tongues but Potomac Cobbler  could add them for me. Well worth it! I added the D rings to the belt in the back a-la-Burberry. The buttons and D rings came from Wawak.  I did promise the lady at Potomac Cobbler I would wear the coat in sometime. Apparently there aren't a lot of people that make this request.

I did welt pockets as opposes to the inseam pockets on the pattern. One thing I realized while working on this coat is the fabric was a bear to work with! Nothing turned out to be easy! But I'm very pleased with the outcome.

I also added epilates to the shoulders. I had to draft the back shield as there wasn't one. I also added the straps on the sleeves if it is needed to tighten the sleeves in a storm. Also I noticed they lined the undercollar in the lining fabric so I did the same. Kind of a nice touch.

So here is my version:


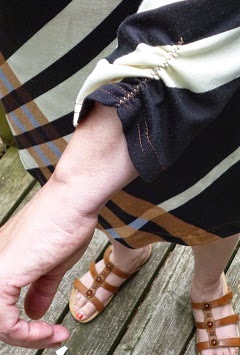
And, without further ado, this is the lining:


Okay, so here is the the breakdown of the cost:

$1.90 for D rings
$3.57 small leather buckles
$1.65 for the larger leather buckle
$15 for the tongues for the buckles (they didn't come with theme but a local cobbler shop could put them in. A shout out to Potomac Cobbler in Woodbridge VA!
$1.99 for thread - put it in here because of all the topstiching
$45.00 for the wool plade lining from Mood
$45 for the Coat Fabric from Michael's Fabrics
$2.70 for the brass neck closure fond on Ebay
Total cost: $125.13
Burberry Kensington coat: $1798.00


93% saved!

So that project complete and we'll see what happens next!

Monday, December 29, 2014

Well, next up......

Despite my better judgement and because I haven't done particularly well in these contests I'm entering another one anyway. Why might you ask?

Well there is the fabulous cotton trench fabric I have from Michael's Fabrics and some really nice wool plaid flannel from Mood. I made a trench a few years ago and I really love it but it is definitely a trench for Spring. I want one for Winter so that's why I got the wool flannel - for a lining. I knocked a few other projects out in the mean time (pictures to come) and have been wanting to do this one for a while so I figured why not? It will mimic (to a point anyway) a $2000 Burberry I've always drooled over (not literally of course).

Right now I'm embroidering some tissue boxes for the lake house but this starts on the first  and because the house is closed for the Winter I have no excuse for not finishing this. Frankly

I do need some inspiration. My favorite sewing instructor, my Mom, passed away early December but she loved to see what I was making right up to the end, even after her sewing days were over.

At the lake I have her sewing box. Even in assisted living she was hemming skirts and pants to help friends save money. Now that's inspiration!

Saturday, August 30, 2014

Entries for the T Shirt Contest!

The title of this one is T Shirts for All Seasons.

Like the Wardrobe Contest I decided to take the approach to do the most intricate shirts first and go towards the easiest. That almost worked. Turns out number three was the most time consuming as it's the first time I worked with Bernina Design Works. The Crystal Works was a breeze but the Paint Works had a bit of a learning curve. The good thing was I had a lot of white knit fabric from a recent Michael's Fabrics bundle so I did have the opportunity to play a bit. Now I feel I've got it and there will be no stopping me in the future!

I based this on the Bernina My Label T shirt pattern that has served me quite well. The one big modification I did was a full bust adjustment. I've never thought that to be needed before but it made a big difference in the way the front lays. I used Louise Cutting's technique from her Threads Insiders Industry Techniques #4. It's also on the Thread's Insider site which I find very handy when I don't have the disc with me. This is a really good series for a more experience sewist as it goes through some very useful techniques. Not really beginner level though.

Well here is the first one:

I got some rather thin yellow rayon knit in the bundle and since yellow is not an everyday color for me I though beach coverup! Our PA house is across the street from the lake so I'm not particularly comfortable walking around in just my swimsuit. I took my basic T, lengthened it, put a V neck on it and shortened the sleeves. I could not resist embroidering the silly crab on the hem. Of course I had to take the picture at the lake on Cyber Seas.


For the next one I lengthened the shirt, made it with slits on the side, made it sleeveless and added the embroidery from Bernina's Tuscan Garden collection using the Mega Hoop on my Bernina 630. This was another fabric from my Michael's Fabrics bundle. This one was a little beefier. I thought this was a good Summer dress and something that can be dressed up or down.


The third one was the basic shirt but I embellished the sleeves with Paint works and Crystal Works. This had to be done on my B580 as it's the only machine I've got that's capable of using this program. The collections was Bernina's Loop-D-Loop which I thought looked like fun.


The Edding pens that came with Paint Works ran out pretty fast so I bought a whole bunch of Tuskineko pens in all kinds of colors from Amazon. They came highly recommended from the Design Works Yahoo group. I then punched the template for the crystals using the Crystal Works program and made four sets, 2 each for the sleeves. It was a lot of fun and I can see wanting to use this more in the future!

The forth one was a basic T with the neck scooped a bit and out of the fabulous nicely heavy wool knit from Mood. I'm not wishing Summer away so quickly but this is going to a nice sweater for when the weather gets colder.


The fifth one also fell out of my sequence on complexity idea. I was going to see if I had time for this at the end - the requirement was four but I shot for six. This cotton knit fabric came from G Street and it's a nice substantial weight. I took one of the curved rulers I got with my pattern design kit from Wawak and made the curves using the ruler. I then faced them and trimmed the facing down. My nice new Babylock cover stitch did a very good job of following the curves to cover. Then I used some very small black buttons to tack the sleeves together. The neck on this one was scooped a bit as well.


Here's the sixth one. I didn't get the cashmere knit fabric from Mood in time so into the stash I went. I found this wild knit fabric I got from the G Street remnant pile years ago and I though dress! I can always use a casual dress! I lengthened the shirt but 12 inches and "ruched" the sleeves a bit. For the ruching I zigzaged over the round elastic and then pulled it tighter. Voila! Instant ruching!


So I made it! Six shirts this quickly makes a very busy month. Wish me luck!

Monday, July 28, 2014

The Pattern Review Mini Wardrobe Contest - Anchor's Away!

Nothing like a challenge to inspire one. Well I decided to enter the Pattern Review Mini-Wardrobe contest. The idea is to make five pieces that can be combined into six outfits. I've never tried sewing with a plan for more that maybe three pieces before so I thought this was a really good time to challenge myself. I chose some very tried and true patterns from Bernina My Label.

What I chose was:

A sort of camp like shirt made out of the anchor fabric I found at Grey's Fabric and Notions on a recent trip to Boston. This was based on the My Label tailored shirt but without the vertical darts with the sleeves widened and cuffed. I also put a pleat in the center back. I could not resist the buttons I found at G street for this:


A black T shirt but in a really nice knit and with 3/4 sleeves - perfect for summer air conditioned DC area offices. The fabric was knit with a light terry underside which feels great.

Same T shirt pattern with white but with a boat neck and slightly ruched sleeves. This fabric came in a bundle from Michael's Fabrics.

A skirt made of a khaki colored cotton twill. This has side pockets sort of like jean pockets and a fly front. I kept the original slit in the back per the pattern. The fun part was making belt loops with my newly aquired Baby Lock cover stitch machine.  That fun little machine also made short work of the two knit tops.

The last was a nautical inspired skirt using the same basic pattern of the khaki skirt but with a faux flap on the front, welt pocket on the back and invisible zipper as the real closure. The flap was actually two shallow pockets just about big enough to put buttonholes and then buttons on the under portion. I also kept the slit in this skirt as well. This is made of denim and once again, could not resist the buttons I found at G Street:

I wanted a water backdrop for the pictures but I also needed a place to change. I realized that the town of Occoquan which is literally just down the street had a visiter center. I asked the nice guy in there if I could leave the clothes there and use the lady's room to change. He said of course!

The first was the combo of the khaki skirt and black tee:

Then I put on the anchor shirt over the khaki skirt:

After that it was the white shirt with the khaki skirt:

The over to the naval inspired skirt, first with the white shirt:

Then with the black shirt:

Then with the black shirt and anchor shirt over it. And the goofy captain's hat I found on Amazon:


So there are all six! This contest has a lot of fiece competition but the real winning felling was I actually finished and have quite a few pieces of new wearable clothes!

Sunday, October 30, 2011

The essential trench coat

One of Tim Gunn’s essential looks is a classic trench. Bernina My Label to the rescue! A recent pattern release was a classic trench coat. What a project but so worth it!

The fabric came from Michael’s Fabrics. It’s a Zegna 100% cotton rainwear fabric. So luxurious… I decided I needed to put leather buttons on it and found the perfect ones at MJ Trim in New York. Finding the leather buckles were another story. The only place I could find them was at Klein’s Haberdashery in London, England. I email them the link for the buttons and asked if the buckles they had would be a match. They said they would be suitable – now that does sound British!

How they got here was really interesting. They couldn’t ship to the US but my cousin is engaged to a guy in England and he said I could send them to his house and he would bring them on his next visit. On the way back to the airport they stopped by to drop them off to me. Now that’s service!
The pattern had the front gun flaps. I also lengthened the coat as I wanted it to be full length.
I lined it with some very nice coat weight lining from Atlanta Thread. I added a back vent and the rain shield to the back.
Needless to say this turned out to be a very lengthy project! I bought some light colored fabric from Michaels for a winter version on this with a quilted lining. I think it will be a while before I do that one.

Sunday, June 19, 2011

The essential LBD

I don’t know what took me so long but I’ve always wanted a little black dress. It seemed kind of ridiculous that I can sew and have virtually anything I want but didn’t have one of those. Well, the Tim Gunn challenge on Patternreview.com was just the motivation. I have the princess dress My Label pattern drafted specifically to my measurements. I used it for the day time dress but I thought it would work well for the LBD. I had some black on black striped silk fabric from Michael’s Fabrics that I had received in a bundle a while back. Those bundles are fun when offered! Any fabrics I don’t like become muslins and any I do are a great bargain. Anyone interested in this watch out on the MichaelsFabrics.com website.

I also lined the dress in black silk charmeuse I ordered from Mood.com. I made the sleeves ¾ because that way it would work during either Winter or Washington’s over air conditioned Summers. There is a slit on the back. This might be the first of several black dresses. Now that I’ve made one I’m inspired to make more!

Friday, May 13, 2011

Black dress pants for the Tim Gunn Sewalong

These are my completed black pants. I used the Bernina My Label flared pants but narrowed the leg. I also omitted the back pockets as I didn’t see any reason for them. The back is much smoother this way. I used a classic fly front and belt loops. The fabric was a black on black stripe silk suiting fabric I got in a Michael’s Fabric bundle a while back. This is how they look in the front:
 And this is the back:
Gotta love those My Label patterns!

Monday, February 28, 2011

Rain, rain, rain....

Well, what a soggy day! At least I have the perfect jacket for keeping dry! I made this using the Bernina My Label Barn Jacket pattern and the fabric was a combination of raincoat fabric from Michaels Fabrics (which suspiciously resembles Burberry) and a very nicely coordinating Bamberg lining from G Street Fabrics. The lining was a dead on match for the inside of the raincoat fabric.

I did the front zipper as a concealed zipper and put some snaps on to finish the closure:


I made the hood detachable so if I care to remove it I can. I used buttons to attach the hood.


I did a pretty interesting welt pocket, great as I always need a place for keys and such:


This made me feel pretty stylishly dry today!